


Traveling with your Baby or Toddler; Everything you Need to Know!
- Apr 22, 2022
- 16 min read
Updated: Jan 21
We have traveled quite a bit with our daughter, Adalynn. We've flown at 3 months, 6 months, 9 months, 12 months, 15 months, 18M (solo) and 23 months- all with her as a lap child!
I’ve always heard that traveling with a toddler is so much more difficult than traveling with a baby because they are on the move and they don’t want to sit still… and everyone who said this was completely correct. While I was definitely nervous that my baby would hate the flight- the first year of travel was a breeze (as long as you are well prepared which I'll outline in this post).


As they get older and more independent; it gets a little harder. They sleep less and want to move around more. And they may not be taking regular contact naps and have trouble sleeping on the go.
At 23 months we flew to Hawaii (a 12-hour travel day) with Adalynn as a lap infant, and on the way back Alexander was VERY SICK and it was up to me entirely to keep her happy.
As you can see, each time we learned more & more about flying; and with that comes a lot of confidence. I've included everything we have learned (the hard way) in this blog post for you!

I make a percentage of money off the affiliate links provided in this post at no additional cost to you, thank you for your support.
Set Realistic Expectations:
First and foremost, it's essential to set realistic expectations. Understanding that kids have their own needs and may not always be on their best behavior is key. This may mean mood swings, and tantrums, but also can mean they are clingy and attached to you.
Remind yourself that they are in a new (potentially scary) place and their normal routine is completely disrupted! The calmer you can stay and the more understanding you are- the easier it will be for everyone. This goes for wakes, naps, feeding, and really everything.
Planning:
When planning your trip, do your best to be mindful of your child's current schedule and if possible do what will be easiest for them. Especially when flying- consider the flight times, layovers, car rides, etc, and compare this to their normal eating/sleeping routines.
Personally we always always always try to get direct flights whenever possible to avoid layovers and lengthening our travel time. We also almost always opt to be dropped off at the airport by friends/family/Uber so that we don't have to deal with parking, public transport, shuttles, rental cars etc. This can easily add an extra 2-4 hours onto your trip which is no fun with little ones!
If you're starting your travel day extra early, try putting them to sleep a bit earlier. If you will be traveling through nap time(s), be flexible! They most likely won't follow their normal schedule- so watch for cues and let them lead. The most frustrating part of flying with a small infant was trying to keep them on their nap schedule.. and when flying with my 2 year old to Hawaii- she ended up napping twice instead of her normal one nap. This is what I mean when I say.. go with the flow!
My top 3 things to make a travel day go well;
Use a checklist to pack ahead of time and ensure you have EVERYTHING.
Keep carryons, diaper bags, and purse/fanny pack incredibly organized so you know where to find everything
Dress your child (and yourself) in layers to easily adjust to the cabin temperature.
Packing:

I'm an over-packer and proud of it. I created checklists that have everything that you could possibly need when it comes to packing for baby or yourself, plus what to bring in your carry-on! You can download the checklists on my website.
Be prepared for more luggage- traveling with a baby means extra gear and more to lug around!
I've used these same checklists every single time we have traveled with our baby and still use the same checklists with her as a toddler. They are completely customizable which means you can alter them so they fit your family's needs perfectly. + there is an adult checklist for you and your spouse too!
We invested in some good quality luggage that rolls easily and the wheels spin- which makes moving throughout the airport so much easier. *bonus is its bright orange and so easy to spot. I also love using packing cubes to keep the luggage organized during travel and I also use them as drawer organizers in our hotel room when we arrive! You want to make sure that you have identification tags on ALL your luggage, including your diaper bag/car seat/stroller- in case you end up checking items or misplacing them! Having this on ahead of time saves you time when you are checking in at the airport.
The night before, weigh your luggage and move it to the front door (since we opted to UBER instead of drive) or load them right into your car. I have a list of last-minute "To-Do's" of things I need to grab/do before we go and a spot ready and waiting for them.

Make sure your diaper bag or carry-on is organized. You are going to need a LOT of things, and the more organized you are, the easier it will be to find anything you are looking for. Avoid tossing everything into a pit of a bag, and take time to organize it all. Watch this video to see how I organized mine!
Pack enough diapers and wipes for travel (including planning for delays/changes in travel plans/etc. You can always have more delivered from Amazon to our hotel (along with some non-toxic laundry detergent) or buy them at a local store. Consider having some overnight diapers for on the plane to lessen the amount of diaper changes (and blowouts). Be sure to bring disinfectant for the changing stations, wet bags for soiled diapers/clothing, and an extra change of clothes for the whole family- think worst case scenario! If your little one is potty trained- consider packing a travel potty seat.
I always try to have as much done ahead of time to reduce my amount of stress.
Kids pick up on stress so planning and prepping is an easy way to have a smoother travel day.
Ticketing:
When booking your trip, make sure you denote that you will have an infant in your arms. This will be marked on your ticket when boarding. For some airlines, you get an actual boarding pass and for the other airlines, it may just be denoted on the ticket that there is an infant in arms. I always bring a birth certificate as a form of identification for her- I've never personally had to use it but many moms have stated they had to show it as proof of age or relationship!
If you are purchasing a ticket for your child, be sure you book seats together and bring identification for them to pass through security. *If you plan to have your child in a car seat for the flight you must purchase a ticket for them.
DON'T DELAY checking in (I once missed it by an hour and couldn't get a seat next to my husband on the way home, which made everything just a tad bit harder).
Transport:
Make sure you plan for an appropriate amount of time to make it through baggage and security- depending on the size of your airport. Adding in a child means considering naps, feedings, and fussiness as well. The last thing you need is for a baby demanding to be fed, screaming their head off while trying to pass through security.
When flying out in the morning I always let Adalynn sleep as much as possible while I grab the last-minute items and get ready myself. I then wake her up and breastfeed her (again, giving her PLENTY of time to eat) or grab breakfast to go when she started eating solids.
Before I walk out the door I grab my ring sling- in preparation for arriving at the airport because it is always a bit chaotic. The first thing I do when I arrive at the airport is stick Addy in the sling or stroller. If you don't choose to use a container you may want some type of harness or tracking device because airports are busy and in a split second you can lose them in a crowd.

We always use an UBER to get to the airport so my husband loads the luggage while I load the car seat and buckle her in. *PRO TIP: Learn how and practice installing YOUR car seat without a base! Even if you don't have to install it on the way TO the airport- you most likely will when arriving at your destination.
We use this travel car seat because it only weighs 7 lbs and makes carrying it through airports, hotels, and even installing it a breeze. We also use this backpack car seat carrier with a wheel option that we immediately put the car seat in after we arrive at the airport. *We also stuffed some extra diapers and wipes in the bottom of ours :)
Airport:
We always chose to fly with Addy on our laps (in the US, children under 2 fly for free in your lap). Still, some people will opt to pay for a seat for their little one and keep them in the car seat for extra safety. You can also ask the gate attendants if there are extra seats available-They may change your seat to allow you to bring the car seat on for FREE but this is NOT the case for full flight.
We always bring the Zoe Travel Stroller which is super light and compact and folds up easily with one hand. They have a single or double travel option available (which is our FAVORITE with 2 kids!) Use my link and save $15
You can check OR gate-check strollers and car seats for free. This means you can check strollers and car seats for free at the regular baggage (if you don't need them in the airport this is the easiest way) or bring them throughout the airport and as you are getting on the plane, you leave them to be stored underneath. (Make sure everything is tagged with your name and number!).

Shop the Tula Ring Wrap, Joey Cloth Carrier (10% off with code HAIZMAN), Sakura Bloom Skout Carrier, or Zoe Travel Strollers (get $15 off if you use my link!)
I always opt for using a carrier throughout the airport so that I can be completely hands free. I also always use a belt bag to keep our important documents in so that I can easily access them. This included Addy's birth certificate (to show proof of age), boarding passes, IDs, luggage tags, cash/credit card, and small items like pacifiers for Adalynn or Force of Nature disinfectant.
As soon as we get to our gate we get some type of food, and let Adalynn move around. This could mean tummy time on the travel changing pad, sitting in a seat and playing with toys, walking around and waving to strangers, or running through the terminals as she got older (she's lucky she's cute and gets away with it). The goal here is to let her move as much as possible so she can get as much energy out before she's stuck on mom & dad's lap.
Security:
This depends on the day. Sometimes you get pulled aside for a family lane, sometimes you can keep the carrier on, sometimes they require you to take it off, sometimes they have you pass through as one unit, and sometimes its seperate.
We also deny the metal detector (I do this for both me and Adalynn because I'm a bit crunchy and don't want any extra rays going through my body). This requires them to thouroughly check your belongings and will pat the adults down and swab your hands- a bit more time but not bad overall.
Be aware of TSA rules if you are traveling with formula, breastmilk, or even pouches/purees. ANYTHING for baby is okay to travel with, it just might require additional checks. I have traveled with frozen breastmilk and they didn't even ask me about it, but any liquid does usually require an additional swab. We have traveled through security with snacks, water, lotions, balms, and wipes (which always set the machine off) and its never a problem.
Delays/Upsets:
Delays are so out of our control, but THEY SUCK. Our first time traveling with Adalynn we arrived at the airport at 8:00 a.m. and went through delay after delay (ON and off the airplane) until 4:00 p.m. A full day of keeping Addy happy while not making it anywhere, it was rough but my biggest tip is to stay calm.
Kids pick up on our feelings. If I was stressed, overwhelmed, or embarrassed and anxious to keep Addy quiet- then she would feel that and most likely be extra fussy.
Staying calm and letting things play out however they did, kept Addy happy and calm despite the torture of delays.
I'm not saying this will work... but give it your best shot! And if your babe is extra fussy, don't worry about it. People will understand, and if they don't, you'll never have to see them again!
Boarding:
Take advantage of early boarding to get settled before a rush of people comes on. *sometimes when Addy was very tiny I could even use this time to get her to sleep before we even took off!
Before you board:
Make sure you fill your waters and have food/snacks
Use the restroom and do one last diaper change
Double check your carryons are organized and your must haves are easily accessible
Have diapers/wipes/sanitizer bundled up so you can grab quickly
Have your boarding passes ready
Gate check strollers & carseats
Flight:


I used my carry-on checklist to pack her bags so you can see what to include but the biggest game changers for traveling with a baby (under the age of one) were the items below.
1. Ring Sling- After trying several different options (nursing pillow, wrap, structured carrier, no carrier) My BEST option for newborns all the way up to toddlers is the ring sling. Not only can I easily pop a kid in there throughout the airport but it is SO easy to nurse in, and makes a good little nest to play on my lap while still being "strapped in".
2. Pacifier/Breastfeeding/Bottle- This not only helps their ears during take-off and landing to handle the change in pressure, but it's also a way to soothe them to sleep or just offer comfort in an otherwise stressful situation. Personally, I always nursed but a bottle or pacifier works just as well. I also recommend bringing lots of back up pacifiers or a portable sanitizer, just in case pacifiers or bottles fall on the floor.
3. Blanket/Swaddle- We brought the swaddle for addy up to 6M and then just switched to a blanket, but on every single flight we've ever been on she's slept so it was crucial to have. This was the swaddle we used, but use what your baby is comfortable with!
4. Headphones/Kindle- Whenever Addy slept I needed to entertain myself, so I either watched downloaded shows or read a book on my Kindle. Be sure you bring an adapter!
5. Water Bottle WITH straw- With a tiny one always in my arms, having easy access to water (for myself and eventually her as well) I always preferred a water bottle that had some type of straw so I could easily drink. *If it's a flip lid make sure it's open during take-off and landing or else it will squirt water everywhere due to the change in air pressure.
As babies got older (9M-18M)- they play more and sleep less. We used a silicone toy strap to attach Addy’s toys to the back of the seat in front of me. This was great to keep her toys from dropping on the floor and constantly having to pick them back up. Shop favorite toys on amazon!


Snacks were her main source of entertainment so we always stocked up on those. (As well as a billion travel toys to keep her attention as much as possible) Make sure to have lots of healthy snack options and water to keep your little one fueled (a sugar-filled child with a headache or upset stomach won't make travel easier). Bringing water for your toddler sounds like common sense but since bottles need to be emptied to get through security, you need to make sure you fill up before you board! It takes quite a while before the flight attendants offer water and if there is a delay it is even longer- so make sure that you are personally prepped (you could even set an alarm on your phone to fill them up!)
TOP PRODUCT ALERT!!! The biggest game changer as she got older was this travel tray that kept snacks, books, toys, and other activities right in front of her and not sliding all around! Not to mention is was CLEAN and free of what I can imagine are disgusting germs covering the entire tray table. I can't emphasize enough how useful this tray was, and that I will forever be using it every single time we fly with a baby or toddler.
For travel toys we always brought some new exciting ones, and some of her tried and true favs from home- but we made sure to hide these a couple weeks prior to leaving for our trip so she was excited about them on the travel day! So many of these toys are tiny, so if you organize well you can bring A LOT in your carry on(s).
When we took our long flight to Hawaii, we had two full bags of activities/snacks to keep Adalynn entertained. As soon as she was done with one thing, we moved on to the next.
Do you do screen time?
No we don't! We never allowed any screen time before the age of two- even on our 14 hour travel day to Hawaii when Adalynn was 23M.
Here is my unpopular opinion (about screens in general but especially during travel). We ALL feel worst after staring at a screen, even as adults. Travel is already so exhausting and I don't want to exacerbate that by plopping my child in front of a screen every chance I get. Sure, she might sit still for the 2 hour flight- but I fully believe the rest of the travel day will be BRUTAL and I'll have an even more irritable child on my hands.
Instead, download stories or songs for them to listen to and be prepared with LOTS of activities. Then have some movies or shows on a device as a last case scenario if shit really hits the fan and you're desperate.
Where to sit?
I always preferred the aisle when Adalynn was under a year old. This allowed me to have a little extra room in the aisle- but also gave me the ease of standing up and rocking her if she was super fussy- or if some type of blowout happened I could easily run to the bathroom! I'm the type of momma who is completely comfortable feeding in public so I didn't bring a cover. I just used the boppy to support her and fed her right there. (I sat in the aisle seat so I had more room, but for more privacy, you may want to choose the window seat!)
As she got older and wanted to PLAY more, I preferred the window seat (free entertainment looking out the window) but also a little extra room without getting in the way of people moving through the aisle. I personally never let Adalynn play in the aisles because too often the pilot would turn the seatbelt sign on and how the heck do you explain to a toddler that they can no longer play there even though they were just seconds ago?
Where not to sit?
-Don't sit in the last row, right next to the bathrooms. This is a HIGH TRAFFIC AREA, so tons of commotion, which means the baby is bothered and woken up, and it's so much harder to stand up and rock the baby if needed. Plus, the toilet flushing is SO LOUD and may wake your baby every. single. time.
-Don't Sit in the front row with "extra space" This is another place that people will come stand in if there is ever a traffic jam. Plus, you don't have a seat in front of you to hold things which makes it more difficult to grab (and you don't have a place to store YOUR carry-on items which means they have to go in the overhead bin).
Diaper Changes on the flight:
Airplane bathroom:
These bathrooms are SMALL (for a newborn but ESPECIALLY a toddler) To make the diaper changes easier, I rubber band a diaper to the wipes and grab a single sanitizing wipe from the bag to wipe off the table before laying her down. I also bring a sweatshirt into the bathroom with me to put it under her head and cushion her if we were to hit turbulence (sure enough, it happened!) *Don't hesitate to ask for help; the flight attendants are usually more than happy to open up the changing station and close it for you when your hands are full.
On lap:
Practice this at home first! Sometimes if it's a quick change (and only pee) it's so much easier doing it in the seat or on the lap than squeezing into the airplane bathroom. If you do this- make sure to stick it in a garbage bag to dispose!
Lodging:
If you are staying at a hotel contact the hotel beforehand to check to see what they have available to use like cribs or highchairs and also check to see if they have blackout curtains in the rooms. There are also several rental services to rent baby gear that you could check out instead of bringing your own.
Here are some of my sleep must haves for baby or toddler:
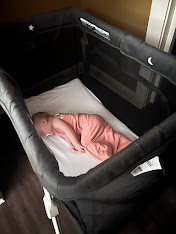
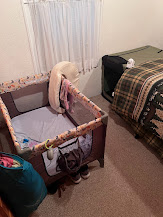
-Bed/Crib:
We always bring our Guava Travel crib because Adalynn is so used to sleeping in it, and we want her to be as comfortable as possible. She's been using it since she was a newborn and she's now two! If your lodging doesn't provide a crib- this is a great option! You can also look for local rental services or bring your own. If they DO provide them, make sure you still pack your own sheet! Consider packing a portable sleep tent or travel blackout blinds.


If your little one has outgrown the crib or is used to the floor bed life- consider bringing an inflatable bed or mat for them to sleep on in the hotel. Be sure that you baby-proof the room if you aren't containing your little one in a crib!

I almost didn’t bring this but I’m so glad that I did! We were able to hang out with friends and have fun without worrying about Addy because I could see and hear her on our monitor. I could even go outside and have a cup of coffee by the lake while keeping an eye on her in case she woke up from naps which was so helpful!
This sound machine keeps her environment perfect for sleeping. You can also try a smaller option like this one.
Hotel rooms are always dry and germs are everywhere so these two items are staples for us. As soon as I get to the hotel I start diffusing, and have all my must-have oils with me to ensure that no matter what the vacation throws at us- we are prepared! *We also start supplementing before travel to gear up our bodies!
Adjusting to Time Changes:
There are a few ways to go about time changes (depending on the severity of it) but here are some ideas to make it just a bit easier!
Gradual adjustment: Try to gradually adjust your baby’s schedule a few days before your trip.
Expose to natural light: Spend time outside during daylight hours to help reset your baby’s internal clock.
Maintain routines: Stick to familiar bedtime routines to provide a sense of comfort.
Be patient: It may take several days for your baby to fully adjust to the new time zone.
Conclusion:
All in all, traveling with a baby wasn't much different than being at home with a baby... moms are rockstars. But it was a lot different than traveling without a baby, and we definitely had to modify our expectations!
Break your trip up into sections to avoid feeling overwhelmed. Let’s focus on getting to the airport first. Then focus on boarding. Then the first flight. Then the second. Each part is separate to avoid feeling overwhelmed by a full travel day.
Always, Jess

L E T ' S B E F R I E N D S!


Quand on fait face à un problème de canalisation bouchée, on réalise vite à quel point cela peut perturber le quotidien. Que ce soit dans une maison ou dans un appartement, un simple engorgement peut causer des odeurs, des débordements et même des dégâts si rien n’est fait rapidement. Beaucoup de gens essaient des solutions temporaires comme les produits chimiques, mais ces méthodes ne règlent pas toujours le problème en profondeur. C’est pourquoi j’ai cherché une solution plus fiable et professionnelle, et c’est là que Maes Service Débouchage se présente comme une vraie référence. Leur approche repose sur des interventions précises et adaptées, ce qui permet non seulement de déboucher efficacement, mais aussi de prévenir de futurs soucis.
Antarctica, the big chill of adventure destinations, isn't just ice and penguins — it's an icy playground for thrill-seekers with a knack for extremes. Imagine stepping onto a land so alien it feels like the moon took a cold vacation. Here, Poseidon Expeditions makes dreams frostier with their cruise on the Sea Spirit, a floating cozy cabin that doesn’t skimp on style. You can wave at seals sunbathing like influencers and catch whales doing their own underwater choreography. But don’t let the tranquility fool you — this place knows drama. The Antarctic Peninsula teases you with surreal icebergs, each looking like a giant gem dropped from a celestial pocket. Feeling bold? Grab a paddle and kayak through icy waters, your…